How to Pay NBI Clearance Using GCash 2026: Step-by-Step Guide
Kung nag-a-apply ka ng NBI Clearance Online, isa sa pinaka-convenient na payment option ay GCash. Hindi mo na kailangang pumunta agad sa payment center kung may GCash account ka, sapat ang balance mo, at tama ang NBI reference number na gagamitin mo.
Pero dito rin madalas nalilito ang applicants. May iba na nakakuha na ng reference number pero hindi alam kung saan ito ilalagay sa GCash. May iba naman na nagbayad na pero pending pa rin ang status sa NBI account. Meron ding hindi sure kung QR code ba ang gagamitin o manual payment sa GCash Bills.
Sa guide na ito, ituturo natin ang NBI Clearance GCash payment step by step — mula sa pagkuha ng reference number hanggang sa pag-save ng successful payment receipt.
Disclaimer: ClearanceGuidePH.com is an independent guide website. Hindi ito official website ng National Bureau of Investigation or GCash. Always verify the final fee, reference number, payment channel, and transaction status through the official NBI Clearance portal and your actual GCash app before paying. The official NBI website links to “Apply NBI Clearance Online,” while GCash’s official Help Center explains that bills payment is done through the Bills feature by selecting a biller, entering required details, reviewing, and confirming the transaction.
Quick Answer: Paano Magbayad ng NBI Clearance Using GCash?
Para magbayad ng NBI Clearance using GCash, kailangan mo munang kumuha ng NBI reference number mula sa NBI Clearance Online portal pagkatapos mong pumili ng branch, date, time slot, at payment option. Pagkatapos, open your GCash app, tap Bills, hanapin ang NBI biller kung available, ilagay ang required details tulad ng reference number and amount, then review and confirm payment. GCash says bills payment generally follows this flow: tap Bills, select biller, enter required details, review, then confirm.
Simple process:
- Mag-login sa NBI Clearance Online account
- Mag-apply or mag-schedule ng NBI appointment
- Piliin ang payment option
- Kunin ang NBI reference number
- Open GCash app
- Tap Bills
- Search or choose NBI biller, kung available
- Enter reference number and amount
- Review details carefully
- Confirm payment
- Save receipt or screenshot
- Check NBI account kung paid na ang status
Basahin din ang aming complete guide sa how to apply for NBI Clearance online para malaman ang full step-by-step process mula registration, appointment, payment, hanggang claiming ng clearance.
Ano ang Kailangan Bago Magbayad ng NBI Clearance sa GCash?
Bago ka magbayad, ihanda muna ang mga ito:
- NBI online account
- Completed NBI Clearance application
- Selected NBI branch
- Appointment date and time
- NBI reference number
- GCash app
- Sapat na GCash balance
- Stable internet connection
- Active mobile number
- Email address
- Screenshot ng NBI appointment/payment page
Pinaka-importante rito ang reference number. Ito ang nagli-link ng payment mo sa NBI transaction mo. Kapag mali ang reference number, puwedeng hindi ma-credit nang tama ang payment sa application mo.
Ano ang NBI Reference Number?
Ang NBI reference number ay unique transaction number na ibinibigay ng NBI Clearance Online system after mong gumawa ng application, pumili ng appointment schedule, at pumili ng payment method. Public NBI payment guides explain that this reference number is used to connect the applicant’s payment to the specific NBI Clearance transaction.
Ginagamit ang reference number para sa:
- Payment transaction
- Tracking ng application
- Checking ng payment status
- Proof sa appointment day
- Troubleshooting kung pending ang payment
Important: Huwag magbayad kung hindi mo pa na-save ang reference number. I-screenshot agad ito bago umalis sa NBI payment page.
Step-by-Step Guide: NBI Clearance GCash Payment 2026
Step 1: Mag-Login sa NBI Clearance Online Account
Pumunta sa official NBI Clearance Online portal at mag-login gamit ang registered email and password mo. Kung wala ka pang account, gumawa muna ng account and complete your personal information.
Before payment, siguraduhin na tama ang:
- Full name
- Birthday
- Address
- Contact number
- Valid ID information
Kung may mali sa information, ayusin muna bago mag-proceed sa appointment and payment.
Step 2: Click “Apply for Clearance”
Pag complete na ang profile mo, hanapin ang Apply for Clearance option. Dito magsisimula ang actual NBI Clearance transaction mo.
Usually, hihingin ang valid ID na dadalhin mo sa appointment. Piliin ang ID na sure kang madadala mo sa NBI branch.
Good options include:
- Passport
- Driver’s License
- National ID
- UMID
- PRC ID
- Postal ID
- Voter’s Certification
- SSS ID
- GSIS ID
Basahin din ang aming complete guide sa NBI Clearance requirements para malaman ang updated list ng valid IDs, documents, at requirements bago pumunta sa iyong appointment.
Step 3: Pumili ng NBI Branch, Date, and Time
Next, pumili ng branch kung saan ka pupunta for biometrics and verification. Pagkatapos, piliin ang available appointment date and time slot.
Kung urgent ang clearance mo, huwag isang branch lang ang tingnan. Minsan fully booked ang pinakamalapit na branch, pero may earlier slot sa nearby branch.
Tip: Kung kaya mo, pumili ng morning schedule para mas maaga kang matapos, pero depende pa rin ito sa dami ng applicants and system status ng branch.
Step 4: Piliin ang Payment Option
Pagkatapos mong pumili ng branch, date, and time, pipili ka naman ng payment option. Kung available ang GCash or GCash-related payment method sa system, piliin ito or sundin ang instruction na lalabas sa payment page.
May public guides and user discussions na naglalarawan ng manual GCash route as GCash → Bills → Government → NBI, then enter reference number, amount, contact number, and other required details. Treat this as public guidance only and always follow what your actual GCash app and NBI transaction page show, because app interfaces and payment options can change.
Step 5: I-Save ang NBI Reference Number
After choosing the payment option, magge-generate ang system ng reference number. I-screenshot agad ito.
Dapat makita sa screenshot mo ang:
- Reference number
- Amount to pay
- Appointment branch
- Appointment date
- Payment method
- Transaction details, kung available
Pro Tip: Kung puwedeng i-copy ang reference number, copy-paste mo instead of manual typing. May characters na madaling mapagkamalan, tulad ng number 0 and letter O.
Step 6: Open Your GCash App
Open your GCash app and log in.
Before paying, check kung:
- May enough balance ka
- Stable ang internet connection
- Updated ang GCash app
- Available ang Bills feature
- Hindi under maintenance ang biller
GCash says users should check biller availability, wallet balance, transaction limits, and app troubleshooting steps when they cannot pay bills.
Step 7: Tap “Bills” or “Pay Bills”
Sa GCash homepage, hanapin ang Bills or Pay Bills icon. Tap it to open the billers list.
GCash’s official instructions say bills payment starts by tapping Bills from the homepage, choosing the biller, entering the required details, reviewing, and confirming the transaction.
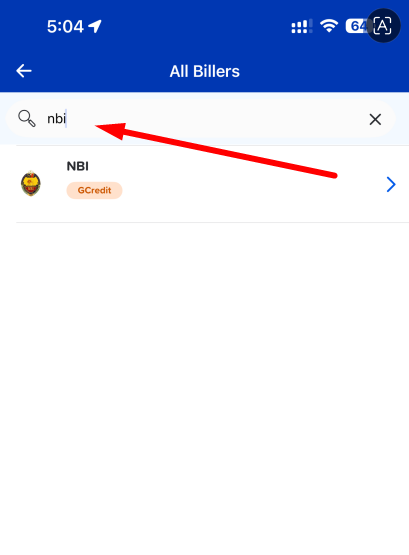
Step 8: Search or Choose “NBI”
Sa biller list, hanapin ang NBI. Puwede mong gamitin ang search bar para mas mabilis.
Possible path:
GCash App → Bills → Government → NBI
Kung hindi mo makita ang NBI or naka-gray ang biller, huwag ipilit. GCash says grayed-out billers may be under maintenance and cannot be paid at that time.
Step 9: Enter Your Payment Details
Pag napili mo na ang NBI biller, ilagay ang required details. Depending sa GCash app screen, maaaring hingin ang:
- Reference number
- Amount
- Contact number
- Email address
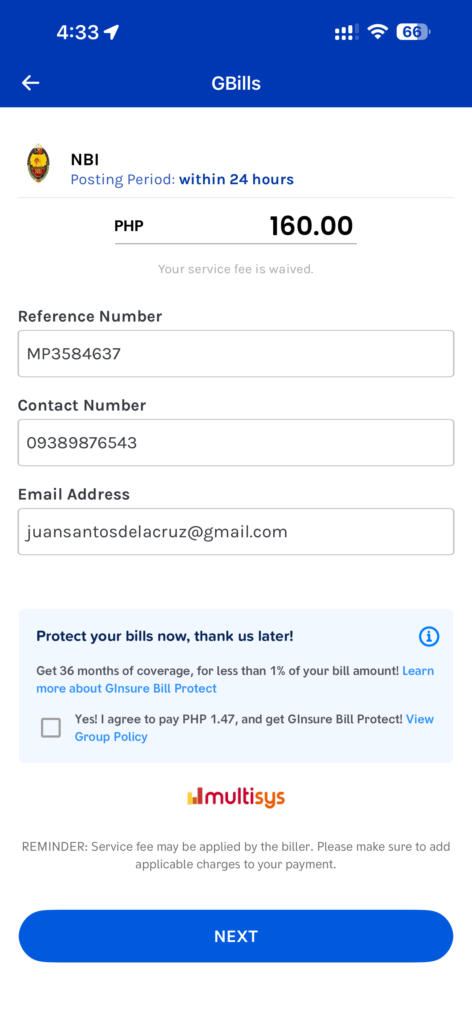
Important: Ilagay ang exact amount na nasa NBI payment page or GCash checkout page. Huwag hulaan ang amount. GCash also notes that biller fees and posting times depend on the biller, so always review the final amount and applicable fee before confirming.
Step 10: Review Before Confirming
Bago mo pindutin ang confirm, i-check nang mabuti ang details.
Checklist bago magbayad
- Tama ba ang reference number?
- Tama ba ang amount?
- NBI ba ang selected biller?
- Sapat ba ang GCash balance?
- Tama ba ang contact number?
- Tama ba ang email address?
- May screenshot ka ba ng NBI reference number?
- May screenshot ka ba ng appointment details?
Kung may typo sa reference number, cancel muna and correct it. Mas mahirap magpa-correct kapag confirmed na ang payment.
Step 11: Confirm Payment
Kapag sure ka na sa details, tap Pay, Next, or Confirm, depende sa GCash interface.
Hintayin ang successful transaction screen. Huwag agad i-close ang app habang processing pa ang payment.
Step 12: Save Your GCash Receipt
After successful payment, save your receipt.
Gawin ito:
- Screenshot the successful payment page
- Check GCash transaction history
- Save confirmation message, kung meron
- Check app inbox or email confirmation
- Keep the screenshot until matapos ang NBI appointment
GCash says users may receive confirmation in the app inbox and email after paying bills.
Step 13: Check Your NBI Payment Status
After payment, bumalik sa NBI Clearance Online account mo and check your transaction status.
Possible status may include:
- Pending
- Paid
- Processing
- Confirmed
Hindi palaging instant ang posting. Kung pending pa rin agad after payment, wait first and check again later. Huwag agad magbayad ulit.
How Much Is NBI Clearance GCash Payment?
The safest answer is: pay the exact amount shown in your actual NBI payment page or GCash checkout screen.
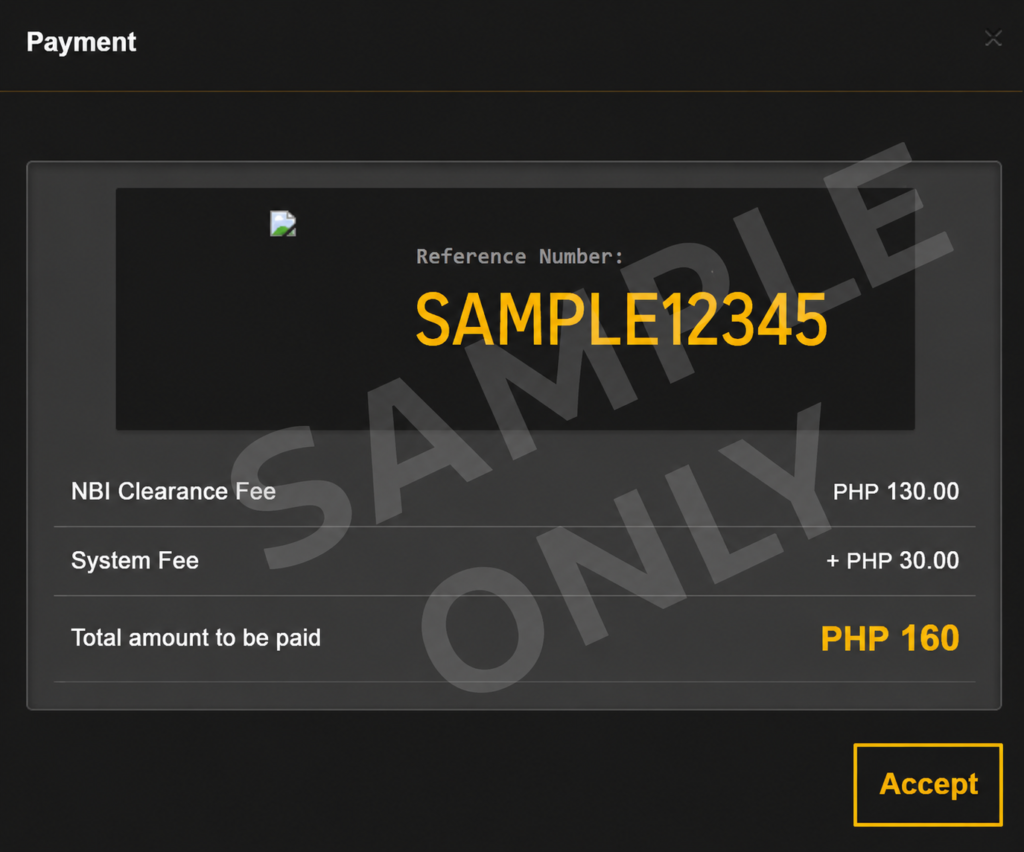
Huwag umasa sa lumang screenshots or old blog posts dahil puwedeng magbago ang total dahil sa service fee, system fee, or payment channel fee. GCash’s Help Center says bills payment fees depend on the biller and users should check the biller’s fees and posting times.
Practical advice:
Sa article mo, huwag maglagay ng fixed amount as absolute final fee unless chineck mo mismo sa official portal on the publishing date. Mas safe ang wording na:
“Always follow the final amount shown in your NBI Clearance Online payment page or GCash checkout screen.”
What If May QR Code sa NBI Payment Page?
Kung may QR code na lumabas sa NBI payment page, puwede mong gamitin ang GCash QR scanner if supported.
Basic QR method:
- Open GCash
- Tap Scan QR
- Scan the QR code from the NBI payment page
- Review the payment details
- Confirm payment
- Save receipt
Some public discussions mention that when a QR code appears, applicants may scan it, while manual GCash Bills payment is used when only the reference number is available or when QR does not work. Treat QR availability as dependent on your actual NBI payment screen.
What If Walang QR Code?
Kung walang QR code, puwede mong subukan ang manual GCash Bills method kung available ang NBI biller sa app:
GCash → Bills → Government → NBI → Enter reference number → Enter amount → Review → Confirm
This matches GCash’s general bills-payment flow: select biller, enter required details, review, and confirm.
What If Pending Pa Rin ang Payment sa NBI?
Kung successful sa GCash pero pending pa rin sa NBI account, huwag agad magbayad ulit.
Do this first:
- Check GCash transaction history
- Screenshot the successful receipt
- Confirm na tama ang reference number
- Wait for posting
- Refresh or log in again later
- Contact GCash support if payment issue is on GCash side
- Ask NBI assistance if payment was deducted but not reflected
GCash advises users who encounter bills payment errors to check biller availability, wallet balance, transaction limits, and app troubleshooting steps; if wallet balance was deducted but the user is unsure if payment went through, users should follow GCash support guidance instead of repeating the payment immediately.
Common GCash Payment Problems and Fixes
1. “Invalid Reference Number”
Possible reasons:
- Typo sa reference number
- Wrong character copied
- Wrong biller selected
- Expired or incorrect transaction
- Payment option mismatch
Fix: Copy the reference number directly from the NBI portal if possible. Kung manual typing, double-check every digit before confirming.
2. “Biller Unavailable.”
Kung hindi lumalabas or naka-gray ang NBI biller, possible na under maintenance.
Fix: Try again later. GCash says grayed-out billers are under maintenance and cannot be paid at that time.
3. “Insufficient Balance.”
Hindi sapat ang GCash balance mo for the full amount plus possible fee.
Fix: Cash in first, then try again. Maglagay ng konting extra balance para hindi kapusin sa service fee.
4. Payment Successful sa GCash Pero Pending sa NBI
Possible na delayed lang ang posting.
Fix: Save your receipt, check transaction history, wait for posting, then check the NBI account again. Huwag agad magbayad ulit.
5. Wrong Amount Entered
Kung manual payment, possible na mali ang amount na nailagay.
Fix: Always follow the exact amount shown in your NBI payment page or GCash checkout screen.
6. Wrong Contact Number Format
Kung ayaw tanggapin ang contact number, check the required format shown in the GCash form.
Fix: Use your active Philippine mobile number and follow the format required by the app.
Tips Para Hindi Magka-Problem sa NBI GCash Payment
- Screenshot the NBI reference number before opening GCash.
- Use copy-paste if possible.
- Make sure NBI ang selected biller.
- Enter the exact amount shown.
- Check if the biller is available.
- Make sure may enough GCash balance.
- Review all details before confirming.
- Save the receipt immediately.
- Do not pay twice unless confirmed failed.
- Bring proof of payment on appointment day.
What to Bring After Paying via GCash
Sa appointment day mo, dalhin or i-save ang:
- Valid ID
- Extra valid ID, if available
- NBI reference number
- GCash payment receipt
- Appointment screenshot
- NBI transaction status screenshot
- First-time job seeker documents, if applicable
- Old NBI Clearance, if renewal
Tip: Kahit digital receipt ang GCash, mas okay kung may offline screenshot ka. Minsan mahina ang signal sa branch.
FAQs About NBI Clearance GCash Payment 2026
Conclusion
Ang NBI Clearance GCash payment ay convenient kung may reference number ka na, sapat ang GCash balance, at tama ang payment details na ilalagay mo. Ang pinaka-importanteng tandaan ay huwag magbayad nang hindi muna sine-save ang reference number, at huwag mag-confirm kung hindi mo pa nari-review ang amount, biller name, and reference number.
After payment, save your GCash receipt and check your NBI account kung updated na ang status. Kung pending pa rin, huwag agad magbayad ulit. I-check muna ang transaction history, receipt, reference number, and wait for posting.
Related Guides:
- How to Apply for NBI Clearance Online 2026
- NBI Clearance Requirements 2026
- NBI Appointment Online 2026
- NBI Clearance HIT Status
- Valid IDs for NBI Clearance
- NBI Clearance Renewal Online 2026